Open Face BBQ Beef Sani…

Made my son go yuuuummmm last night and he exclaimed

“I remember having these when I was little!”.

On Tuesday I bought a Morphy Richards 48815 Digital Electric Pressure Cooker and then made Beef Pot Roast. I now had left over beef which when cold can be a little, ok a lot, dry and stringy. Kids were coming over for some Black Ops and a movie on demand via Sky on XBOX so needed to come up with some tea.

I always big up the Tefal ActiFry as making great chips, but there is something is does better and that is sauté potatoes. I peel the spuds and then cut them in half the long way and run them through the large die of my Potato Chipper. Then I cut them into squares the short way, and it makes perfect squares all the same size. A tablespoon of olive oil and we are away for perfect sauté.

Sauté Potatoes

I am not sure if you have ever tried to make sauté in a frying pan but they never come out brown on all sides. One side is burnt and the other never saw the pan, come on think about it 6 sides and you have to get all those little suckers perfect on each side – no way.

My mother used to make these Sani’s when I was child (wow Déjà vu), I am not sure she used left over pot roast, but I thought reheating the roast in BBQ sauce would be nice. I cut the cooked roast into bit size squares and dropped them into a pot and drenched them with Cattlemen’s Kansas City Classic BBQ Sauce . I am sure that I will get around to making my own BBQ sauce, which works, one of these days but this stuff is just great!!! How great you ask, well it comes around once a year at Costco and I bought 10 bottles!

Beef and BBQ

I chopped some onions for some extra kick to sprinkle on top. The sauté take 30 minutes so at about 15 minutes I lit up the beef and got it up to bubbling then turned it all the way down to low. The odd stir now and again keeps it from sticking.

Here it is ready to inhale.

Plated Up

Wow the meat was soft and fell apart in the sauce, just like the pot roast. The raw onions gave it that little bit of kick! I passed out knives and forks to eat it with, but kids picked up the buns and ate them with their hands. I am not sure if my son’s even touched the sides on the way down to his stomach. We all loved it and as I said, left over pot roast can be as good as the roast itself.

This blog is hosted by Brinkster, great service and support so check it out…
Posted in Recipes, Tart it Up | 1 Comment

I have been convinced to go PC…

No not happy and nice, you know me but instead Pressure Cooker. I was reading Volume 2 of Modernist Cuisine on Techniques and Equipment.

Books

And they were big’n up Pressure Cookers, as a great way to make stock and cook other things quickly. The reason is in the name “Pressure” which raises the temperature of boiling water.

“When the gauge on your cooker indicates 1 bar / 15 psi of pressure above the liquid, the boiling point of water inside can be as high as 120C / 248F. Increasing the temperature of the cooking stock by 20C / 36F forces both the diffusion and the flavor reactions to run faster than they would in an open pot. The liquid in the pressure cooker will not boil, despite the elevated temperature”.

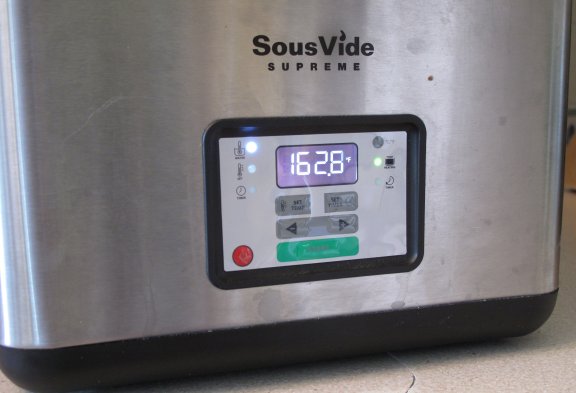
So on Sunday, I was shopping for a clock, but got sucked into a black hole which was labelled Kitchen Supplies. Morphy Richards has a new Morphy Richards 48815 Digital Electric Pressure Cooker.
Boxed Pressure Cooker

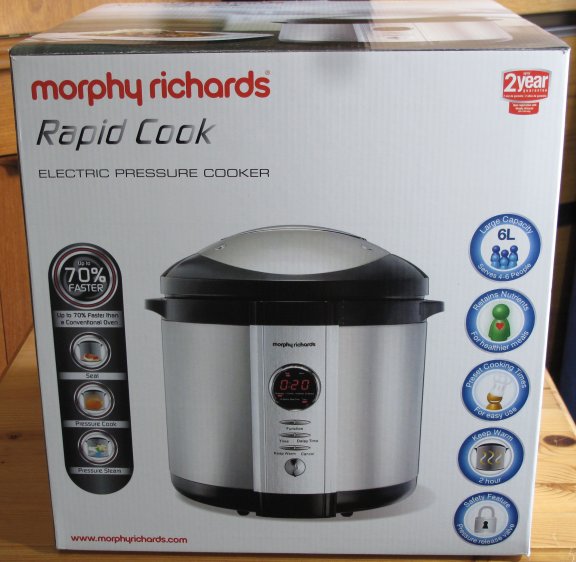
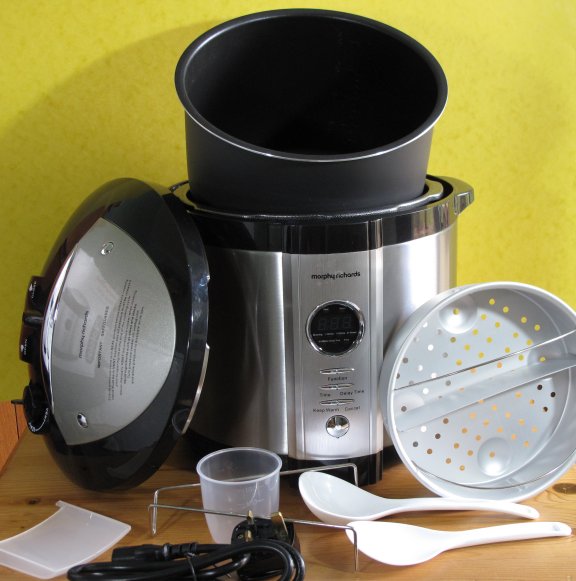
I was always scared of having a ticking time bomb on my hob going clackity clack clack as the pressure comes out. Also the idea of being scalded to death by opening it too soon or Jamilu’s story of a lid being embedded into the ceiling kind of put me off. But this cooker is electronically controlled so you cannot screw it up, which is good for me. Here it is unboxed.

Pressure Cooker

On the way home from picking this up from Tesco Direct (great service and prices) I stopped off at the local Sainsburys and picked up:
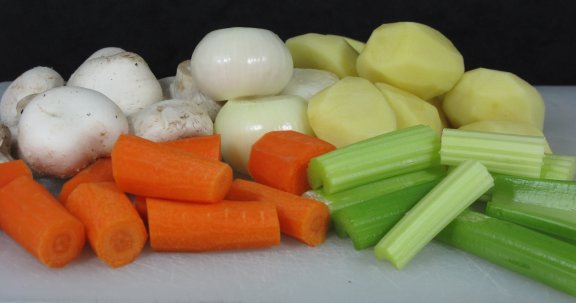
Onions (small)
Mushrooms (closed cap)
Celery
Carrots (look through the loose ones for the thin sweet ones)
Potatoes (medium roasting)

Here they are prep’d for the Pot Roast.

Vegetables

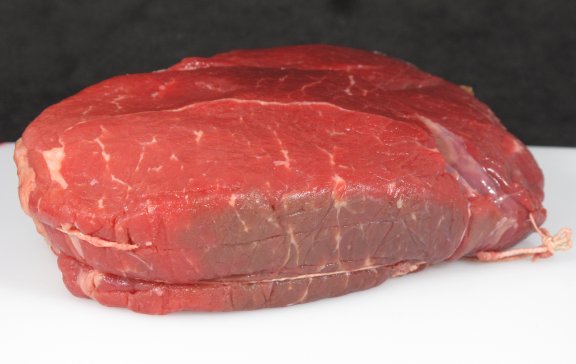
Then I wandered over the beef aisle, and luck would have it that they guy from the butchers counter was just putting down some discounts. I got over ½ kg of rump steak for £2, deal.

Beef

I am writing this in the lounge and there is about 15 minutes left on the Pot Roast and the smell is killing me… I am so hungry. It reminds me of when I was a child. My mother would get up on a Sunday morning and brown the beef and then prep the vegetables before church. When we returned from church opening the door to the house was heaven, and could not get out of my suit quick enough to go yuuuummmm (thanks for all those Sunday dinners Mom). This took my Mom about 4.5 hours to prep and cook. I am attempting to do the same in 1.5 hours today with my new PC.

A couple more prep steps. I boiled up some bottled water and added a beef stock cube to make up about 450 ml of beef stock. Then I enhanced it with a good glug of mushroom ketchup. I had been drying some bay leaves that had been knocked off my bay tree during the past storms and grabbed two leaves for the pot.

Dried Bay Leaves

Another cool thing about this PC is that it has a browning setting. I put some salt and pepper on the meat on both sides. Started the browning setting in the PC and added some olive oil. After 5 minutes it was up to heat and I browned the beef on all side in the pan. This is good as you do not loose any of the goodness of the browning juices before you continue to cook.

Now I was ready to cook. Add the carrots, celery and onions. Pour in the beef stock and mushroom ketchup liquid. Put the potatoes on top of all the rest of the vegetables and meat. Put the bay leaves into the liquid on either side.

Now it is time to put the lid on tight and set the pressure valve. I set the timer for an hour and it is off heating. Ok something is wrong as there is too much steam coming out and it has been 10 minutes with the time on 1 hour. Back to the manual. Ahhhh now I see the steam valve is 180 degrees the wrong way

WRONG
Wrong Valve

RIGHT
Right Valve

I am such a dumb ass.

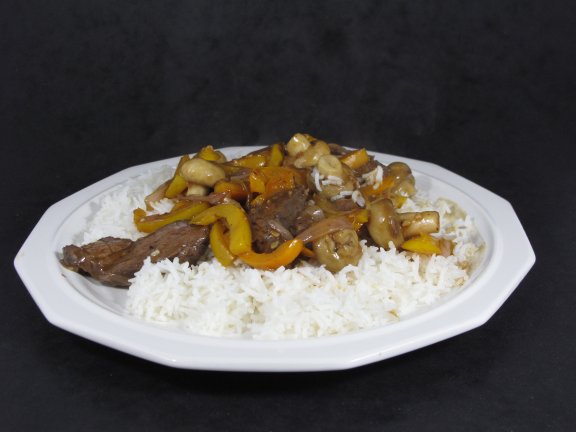
Here it is plated up, wow yuuuummm

Pot Roast with Jus

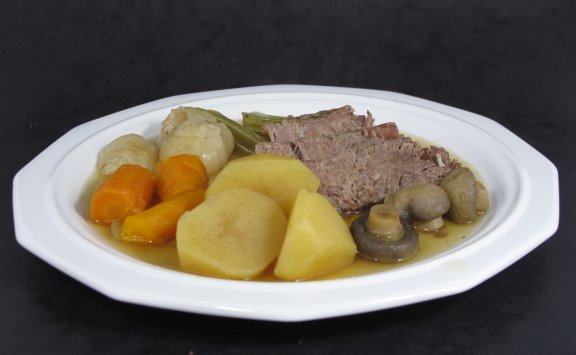
So how was it? Well it is still really, really good because the house smells of Sunday Pot Roast and I am taken back to my childhood every time I walk into the room. The device worked perfectly and I felt safe using it, bare the user error with the valve. It is quiet no clackity clack clack.

The jus had a fantastic flavour. I saved it off to make gravy with the leftovers. I like taking the carrots, onions and potatoes and frying them in butter while heating the meat in the gravy which makes it really moist. To be honest left over Sunday Pot Roast is almost as good as the first time. The other thing you can do is grind the beef and mix with raw onions, mayo and horse radish to make beef salad which is to die for.

Because I boiled it at the beginning for 10 minutes, and the fact I had less meat than the recipe called for I believe that it was a bit over cooked. The veg was pretty mushy, but that is pot roast. The meat fell apart under the knife, but that is also pot roast. Next time I am going to try it for 45 minutes and make gravy with the jus, in memory of my father who finished Sunday Roast with left over gravy on bread, now that is pudding!

Here is the key thing. After work I can serve up a Sunday Pot Roast taking only an 1.5 hours including prep and cooking which used to take 4 hours and was almost as good as me mums.

And because it is still light at 9:30 PM, I am going to include a picture of Stonehenge, as it is the summer solstice.
Stonehenge

This blog is hosted by Brinkster, great service and support so check it out…
Posted in Recipes | 1 Comment

It is scrambled eggs on toast Jim, but not as we know it….

Well I had some time on my hands and some fresh eggs and stale bread so I decided to go Modernist and make some scrambled eggs on toast. One of the cool things about the Modernist Cuisine recipes is that they give two measures for a recipe. One is a weight or volume the other is a percentage of the main ingredient. I did not have 8 eggs, or want to eat 8 eggs myself so I used the percentage measurement of the recipe. Here is the basic recipe on the kitchen computer.

Recipe on Computer

So used 4 yolks which measured to 64 grams. Then every other ingredient was a percentage of this ingredient. Interesting was that I threw away quite a bit of whites that produced these yolks. The other problem was that trying to spoon whites was like herding cats. Spoon in and lift and get half the bowl or nothing at all. Here is the mixed ingredients.

Eggs

I then needed to prep the Sous Vide to 162F

Sous Vide

Bag it up ready for Vac Packing
Recipe in the bag

I then hung the bag off of the edge of the counter and put the open end into the Vacuum Sealer. This allows liquids to be vacuum sealed without sucking the liquid into the machine.

I put some mushrooms on a really easy recipe, to accompany the scrambled eggs. I put some butter into a pan that has a lid that seals really well. When it is sizzling add some button mushrooms, give it a stir then put the lid on. Turn it down to the lowest heat setting and give it a shake every 5 minutes. These can be cooked for ½ hour to hour without any problem.
Mushrooms

The eggs went into the Sous Vide for 25 minutes.

I had some bread that I made on Friday and with fresh bread 3 days is about the limit. So I took a couple of slices and toasted it.
Toast

The eggs were cooked so they were removed from the Sous Vide.
Scrambled Eggs in a bag

I filled my Hot & Cold Whipper for Cream, Sauces, Froths and Mousses with hot water to heat it, kind of like when you heat a tea pot before making tea. I then cut the corner out of the bag of scrambled eggs and squashed them into the canister.
Nitros Gadge

I charged the eggs with a cylinder of nitrous and gave it a good shake. I then exploded the eggs onto toast with the pressurized cylinder, wow that was a rush.

I plated it up with toast on the bottom and extruded eggs on top. I then put the shrooms on the back of the plate and chutney up front. Here is the finished product.

Plated

How long did it take to cook –it took about 2-2.5 hours to do this from start to cleaned up kitchen. This is a lot of time.

Was it worth it – yes as the whole experience including the eating was very interesting.

Was it good – yes, but it did not taste like eggs. It was more like buttery savoury custard, which is a new flavour / texture, but I am not sure if it is what I expected.

This blog is hosted by Brinkster, great service and support so check it out…
Posted in Recipes | 2 Comments

A Couple of days ago I did some cooking…

4 days ago I cooked some rump steak to medium rare and then crash landed them into a ice bath which I then put into my fridge for storage. Tonight I decided to cook beef and black bean sauce, as I really like it and wanted to see how the steak would present itself. So I followed the recipe to prep, but then I grabbed a bag of steak from the fridge
Drew

I then opened it up and drained off the liquid and hit it with a paper towel. Ready to go for the stir fry just needed a bit of slicing
Sous Vide steak sliced

Can you see how it is the same all the way through? I it is all a medium rare from top to bottom.

I then put all the vegi bits together until tender and then dropped the cooked meat in at the last two minutes with the sauce. Crank the heat up and stir, stir, stir fry!

The end result is
Beef and Black Bean with belated steak
and the steak was to die for. No really it just melted in your mouth, which is great since this is rump steak that matched sirloin in previous events.

This blog is hosted by Brinkster, great service and support so check it out…
Posted in Recipes, Uncategorized | Leave a comment

A warm Jacuzzi then a roll in the snow….

When I was a lad I went on skiing holidays to ski resorts in Michigan and Wisconsin where the entrance would be two stories of a massive timber construction with a huge stone fireplace. There would always have a Jacuzzi next to a door where you could jump from the warm bubbly water out into the snow and roll around. It was supposed to be good for you, but we were just crazy and did it for the buzz, especially after a skin full of MD 20/20. Well I did not introduce fortified wine to my food tonight but I definitely gave them the full temperature shear that is involved in hot to cold.

I was reading Modernist Cuisine Volume 2 on Techniques and Equipment on Sous Vide cooking this week and decided that instead of freezing the meat I bought from Costco, I could vac pack it and then cook it for a long time. So I bought some cheaper cuts of rump steak and vacuum packed them and cooked for 4-5 hours in the Sous Vide. I then prepared a salt and ice water bath in which I would super cool the cooked and sealed steaks.

Super Cooled

Notice that the temperature is 28F which is 4 degrees colder than freezing which is 32F. This is achieved by adding salt or sodium chloride (would make it even colder).

For some strange but also reasonable fact it takes as long to take the temperature to 134F (perfect medium rare) about 2 hours depending on the thickness of the steak, as it does to take it back to 32F so I am hoping that by 11:00 or so the temp in the centre of the meat will be cold enough. I can then store the cooked steak which is vac packed in the fridge for up to 30 days. To be honest red meat does not last much more than that in my house before it is trough’d up.

So now I have two bags of perfectly cooked medium rare rump steak in my fridge for 30 days which will be cooked from top to bottom in less than 4 minutes and not ever see the freezer.

This blog is hosted by Brinkster, great service and support so check it out…
Posted in General | 1 Comment

Where there is smoke there is…

FLAVOUR! Yesterday my children bought me a Smoker Box for my birthday. So of course I had to use it. Got some chicken breasts from Sheeplands Farm Shop which has a butcher shop inside owned by Jon Thorners (really nice Steak and Stilton Pie, no really it won an award and everything). Picked up some bread rolls from the farm shop at the same time, as I wanted to frag some opposition on Black Ops with the kids instead of making bread.

I put some wood chips into a jar filled with water about and hour before I wanted to start to smoke. It takes ½ hour to soak the wood chips and another ½ hour to get the smoker box up to “smokin” hot. It will take an hour to hot smoke the chicken breasts, so all in you need to prep about 2 hours before you want to eat. Most books will tell you that is not enough time as you should brine the chicken before smoking which takes about 24 hours, but I had a new food gadget and had a “now” thing going. Drained the wood chips and put them into the smoker box. I have two burners in my Weber so I put 1 on and set the smoker box on the “flavour” bars. Not much was happening so I opened up Volume 2 of Modernistic Cuisine and scanned the pages on smoking. First thing is they said not to soak the chips, ooops not again. The next thing they said is that the temperatures for smoking is really high, so back out to the BBQ and on with the other burner cranked both of them up to full. About 20 minutes later we were smoking. So I turned off the back burner and turned the front one down to 1/2, and let it cool a bit before oiling the grate and putting on the chicken breasts to the back of the BBQ, as they should hot smoke not cook so you should not have any direct heat on them at this point. Now here is the rub, I want to look but if I look all the smoke will go, but I want to look but if I do all the smoke will go….grrrrrr. Set the timer for 30 minutes and go use an RPG to nuke some opposition and forget about looking, oh and shut the windows and doors to the BBQ.

After 30 minutes, I had to have a look
Drew

I turned them over and shut the lid and left them for another 20 minutes. Using a temperature probe I checked that they were 180 F and so they were done
Drew

They would need a slaw so I used:

1 cup shredded lettuce
2 tbsp mayonnaise
2 tbsp salad cream
A large pinch of Malden Smoked Sea Salt crushed

This was all stirred together with a fork. Buns were split, smoked chicken breasts were cut in half lengthwise, and it was all plated up
Drew

I know that it looks like the chicken breasts have skin on them, but they don’t! That is a smoke coating. From what I have read in the Modernist Cuisine you should also take a wire brush to them to poke small holes in the skin that will take the smoke further into the meat, I will update you on that one as I am off to the hardware store for a food toy, go figure.

I said sorry it took so long to cook to my kids, but if you are experimenting with a new food toy it may take longer than you realize. My daughter said no problem, it was worth it. My son just said yuuuummm.

This blog is hosted by Brinkster, great service and support so check it out…
Posted in BBQ, Recipes, Smoking | Leave a comment

My Bad….

Started volume 2 of Modernist Cuisine: The Art and Science of Cooking which is entitled Techniques and Equipment.

Books

I have a really nice Weber gas BBQ which I purchased with money from my 45th birthday that will be 4 years old on Friday. The first chapter in this volume is Grilling and as you can guess there is about 10-15 pages diss-ing gas. Supposedly what cooks the food is not the heat of the air but the radiant heat and the dirtier the heat the better, so going to the dark side was a mistake 🙁

I have always been one to cook burgers and then turn them once and wait for 3 minutes until they finish off. WRONG, when grilling you must turn often. Here is the slap in the face from the book:
“No! A single flip cooks the food neither fastest nor more evenly. It just takes less thought”. OK my bad x 2 🙁

On my really expensive gas BBQ (which sucks see above) which I have a rotisserie, or what Modernistic Cuisine call classic roasting where I mainly cook whole chickens. The bar you put through the chicken is in the middle of the two gas burners. Normally I turn both burners on and close the lid to the BBQ. WRONG X 2. The key to roasting is to show the meat heat and then let it cool a bit (kind of like flipping the foods more often, see above) which cooks the food evenly. Oh and don’t shut the lid because that bakes it not roasts it. OK my bad x 3 🙁 and x 4 :-(.

I am only 40 pages into this next volume and I suck four times… oh well at least I have an Organic chicken in the fridge ready for “roasting” tomorrow on the BBQ and I will you know how the 1 burner and open lid turn out.

This blog is hosted by Brinkster, great service and support so check it out…
Posted in Cook Books | Leave a comment

“That which we call a rose by any other name would smell as sweet…”

If you have a look at my about page this picture is of a course I went to at Waltham Place Farm to learn how to make sausages. I also signed up to be a friend of Waltham Place because they sell Organic Soil Association meat. They have it butchered locally and vacuum pack it so you can store it in the fridge or freeze. If you decide to freeze please see, the section on, freezers are for storing food and not freezing it. OK enough already, so what’s with the Shakespeare quote in the title of this entry? Hold on, hold on, just a little more background first. My daughter and I love to watch MAN V. FOOD, and in one of his shows he had the ultimate hamburger which was made with beef, but not beef as we know it! They used ground veal instead of ground beef. If you have stuck with me so far then here is the reason for all of the background

Rose Veal

I was notified this week that Waltham farm was doing some butchering and they would have some Rose Veal available for purchase. What is Rose Veal? It is a by-product of two things. The first is that to produce milk, dairy farms need to produce baby cows. Girl cows good, boy cows not so good to a dairy farmer. They usually only have one big bad boy in the yard, unless they use the kitchen baster method then it is an all girls school. The second issue is what do you do with the boy cows if you don’t want them? The answer is Rose Veal to some farms. Give them a balanced diet of grass and milk and then let them party in the fields. One quote I saw said that they don’t live a long life, but it is still a good one.

A good burger starts with a good base, so into the bread maker goes:

¾ tsp yeast
400g strong white flour
1 tsp sugar
15g Butter
1 tsp salt
280 ml of water

Bread Ingredients

Program your Panasonic Breadmaker for bread dough. This will make 6 buns. 2 ½ hours later the beeping in the kitchen tells you the dough is done and it is time to get messy. The machine has done its work and produced a ball of dough.

Dough Ball

WARNING: before you get covered in dough and flour, get your baking tray out and spread some butter on it. Then get your pastry board or marble slab out and dust down with flour. OK now you can continue…

Get some flour; you will need the bag if you do not want to wear the dough as gloves. Don’t be afraid of flour, as soon as things get a little sticky chuck some more on it. Sprinkle some around the edge of the pan between the dough and the pan and then some on top. Dust your hands with flour and punch down in the middle and grab the paddle that is in the bottom of the pan and pull it out. Make your hand flat and shove the flour you sprinkled around the edge down to the bottom of the pan all along all four sides, and when you are at the bottom pull the dough up to release from the pan. Flour both hands again and then you should be able to pull the dough ball out of the pan. Pat it into a ball adding flour to any stick bits. Now grab the big ball in the middle with the thumb and index finger squeeze to make two balls. Repeat until you have 6 balls. Now get some flour and cover one of the balls and proceed to push your thumbs up into the bread as you pull back on the top with your fingers until all the air bubbles are removed. Use more flour if it gets sticky. Then pull and flatten and pull the dough out to a round shape.

Video on: How to Make Rolls

Off they go to a warm place or your airing cupboard if you live in the UK. They will be in there for about 30 to 45 minutes (ok I have to say the baking catch phrase…) or until about doubled in size. They never get that big until they are stuffed into the oven so just put them somewhere for 30 minutes and get on with dinner. Now turn your oven on to GM7 or 220C or 425F and put a shelf about ¾ way up the stack. BTW now is a good time to do some dishes as heating the water will help the airing cupboard to warm up and raise the bread.

When the oven gets to heat it is time to put the dough in for 15 minutes, and they should be brown on top and cooked through.

Cooked Burger Buns

At about 40 minutes before trough it is time to make the French Fries. Yes I said French Fries and not chips as they say here in the UK. As you can see the Chip Maker has two dies, one for Americans and one for Brits.
Potato Chipper

The key thing when using the ActiFry is that you need to remove starch and also have very dry potatoes. Wash them really well in cold water to remove the starch.
Chips Washed

Then use a tea towel and push them around to make sure they are dry.
Chips Dried

Now at 30 minutes before dinner the potatoes go into the Tefal ActiFry and cover with at most a tablespoon of olive oil. This will produce French Fries at less then 3 percent fat and that fat is olive oil, so almost good for you.
Actifry with Raw Chips

At 20 minutes before the fries are done put a grill pan on the stove at medium heat. Add some olive oil and with a paper towel cover the pan with a thin layer of oil. Put the burger on the hot pan and adjust the heat until you can just hear it sizzle.

Cooking Burgers

This meat cooks very slowly compared to standard mince. You need to watch the cooking move up the sides of the burger and turn it when it is about ¾ way through. Then cook for about another 5 minutes. If you want cheese then add at about 2 minutes left and then cover with a lid. I cooked my burger for 3 minutes when I turned it over and it was probably a bit rare for most.

While the meat is sizzling in the background it is time to make the special sauce. I use a mixture of 2 parts mayo to 1 part Tomato Chutney from my local farm shop. The chutney is not the acidic vinegar style, but instead sweet. Mixed they make a great burger sauce.
Special Sauce

French Fries are cooked and ready to eat…
Fries Done

So lets plate this sucker up and EAT it!!
Fries Done

My opinion is hmmmmm. Not as astounding as I thought it was going to be. The texture was very nice and the burger melted in your mouth. It took a long time to cook compared to normal minced beef which kind of freaked me out, as you are seeing the second attempt here. The first one was shockingly raw inside. I am not really sure what is going on as I used my normal burger cooking method. The other thing that is counter intuitive and made me think was that I sacrificed flavour for texture. There was a faint taste of beef, but nothing like a properly aged bit of beef, so I guess my expectations were kind of set wrong. I did not rest the burger either so if I would have put it on a plate with a lid over it for 5 minutes the rareness may have been less. I have another ½ pound to play with so I will update this entry with further enhancements to the trial.

This blog is hosted by Brinkster, great service and support so check it out…
Posted in Recipes | Leave a comment

Things that make you go hmmmmm……

Chef Nerd here 🙂 I finished volume 1 of Modernistic Cuisine tonight. The final chapter was Chapter 6 which is The Physics of Food and Water. I came across several things that made me go hmmmmm!

Freezers are for storing food and not freezing it:
Long slow freezing of food causes a change in the structure. I always wondered why, when a steak with no blood on it, was put into a Ziplock and then into the freezer and then defrosted it would be soaked in blood? Well it seems that the long slow freeze causes large ice crystals to be formed in the meat over time. Then when it is thawed they leave holes in the meat and it loses twice as much fluid as if it had been frozen for 48 hours. So the next time I go to Costco for £50 of Sirloin I will vac pack them in Sous Vide bags then plunge them into a salt brined ice bath to quick freeze. Then into the freezer for storage (I will let you know how this turns out). Kind of funny is the quote referencing home freezing; “Unfortunately, the worst method is also the one most commonly used!”.

Different bubble sizes:
I always wondered why when boiling something that you had huge bursting bubbles in the water and then the small champagne style bubbles on the food. Well it appears that the huge bubbles are the water turning to steam on the bottom of the pan, where the heat is the highest and trying to burst to the surface. The little bubbles on the food is the air being forced out of the food you are boiling.

Stale bread is wet:
The reason bread goes stale is that it has absorbed moisture from the air, not dried out. The crust has absorbed moisture and becomes soft not crunchy. The bread has absorbed water and the starch has crystallized to make the bread hard, go figure.

Why do ice cubes in your freezer shrink in size over time:
And what is that doing to your expensive sirloin steak? Cold dry air can dehydrate your food in the freezer. Please see the previous post “Freezers are for storing food and not freezing it”. Wow I thought meat was ok in a freezer for up to a year, but man this is a bit of a kick in the man bits.

The last page was an epiphany:
The water where I live is hard and really sucks. Not only does it mark pans and glasses now I find out that it can also toughen vegetables cooked in it as the minerals in the water combine with the pectin in the cell walls to toughen them. OK, a crate of bottled water this weekend at Costco and maybe some more house white for the chef.

I felt bad about not having any pictures in this blog so here is a…
Rabbit with Pancake
Rabbit with a pancake on his head.

This blog is hosted by Brinkster, great service and support so check it out…
Posted in Cook Books | 1 Comment

Tart it Up and say yuuuummmm…

I think that I will start a new category on my blog which is Tart it Up… as a way to take food from the grocery store with additions to make you go yuuuuummmmm. The reason I am writing this today is because in the past I had purchased some frozen 4 cheese ravioli from Costco, which was pretty good and boiled from frozen in 3 minutes. I don’t always have 2 hours to cook so this was quick and easy, and vegetarian for a change. The problem is that I had run out of said pasta. On my last two trips to Costco I could not find it in stock, as with all things in this store they come and go. So I stopped by the fresh pasta and noticed the little “you can freeze this” icon. Further investigation on the cooking instructions: If cooking from frozen add 1 minute – BINGO!!! This is what I picked up.

Costco Pasta

I also scored some grass, which is my term for asparagus.

Asparagus

I store it like cut flowers, cut a bit of the ends off and then put them into a glass vessel and add a little water to the bottom (change the water every other day). I think that I have mentioned dead ending before but here is the scoop on this. It seems like a waste, but it is better than a mouthful tough fibrous green stuff. The bottom of the grass is tough. So to find where the tender part is you take the stem with the top on your left hand about half way down. Grasp the cut end between thumb and fore finger, as little as you can. Then bend the stalk and it will snap. Left hand yuuuummmm, right hand compost heap.

Asparagus dead ended

I was going to add some finishing’s to the pasta and steamed asparagus (10 minutes) to Tart it Up:

Balsamic Vinegar
Garlic infused Extra Virgin Olive oil
Parmigiano-Reggiano

Finishing's

I don’t grate the cheese as it seems to disappear into the pasta, but instead I use a vegetable peeler to create cheese curls. They look good, and give you a real taste of the cheese when you bit into them.

 Parmigiano-Reggiano curls

I put the steamed asparagus in a bowl along with the boiled pasta and then added the Balsamic and Olive Oil. Then I sprinked it with some Cracked black pepper.

Cracked Black Peper

Topped with the curls of cheese this is it plated up.

Asparagus and Ravioli Tarted Up

First couple of bites were nice but there was something missing, a sprinkle or crushed sea salt.

Sea Salt

Now it is Tarted Up and yuuuummmm.

This blog is hosted by Brinkster, great service and support so check it out…
Posted in Tart it Up, Vegetarian | Leave a comment